It happens to the best of us. You pull your prized heavy-bottomed pan out of storage, expecting the slick, black sheen of a well-loved heirloom, but instead, you are greeted by that heartbreaking orange tinge of oxidation. Most home cooks panic, immediately reaching for harsh steel wool or—worse—chemical cleaners that threaten to strip away decades of hard-earned seasoning. This reaction, while understandable, often causes more damage to the cast iron surface than the rust itself. There is, however, a specific restoration habit used by restoration experts and professional chefs that contradicts the fear of using abrasives on seasoned pans.
This technique utilizes a common pantry staple in a way that balances abrasive power with chemical safety, effectively scrubbing away debris and surface rust without destroying the essential polymerized oil layer. By combining the crystalline structure of coarse salt with the natural moisture and mild acidity of a root vegetable, you can perform a localized resurfacing that saves the skillet. Before you consider throwing that rusted pan in the trash or ruining it with oven cleaner, you need to master this granular restoration protocol.
The Chemistry of the Salt Scrub Method
The science behind using salt to clean iron lies in the Mohs hardness scale. Cast iron is significantly harder than salt; therefore, while the salt crystals act as an abrasive agent strong enough to scour away carbon buildup and ferric oxide (rust), they are brittle enough to shatter before they can scratch or gouge the underlying metal. When you introduce a cut potato into the equation, you are not just using a scrubber; you are introducing a mild application of oxalic acid, found naturally in the potato, which aids in breaking down the rust chemically while the salt handles the mechanical removal.
Comparative Analysis: Cleaning Methods
Understanding why salt is superior requires looking at the alternatives commonly used in American kitchens. The goal is to remove the defect without compromising the vessel’s integrity.
| Method | Target Audience | Impact on Seasoning | Risk Level |
|---|---|---|---|
| Steel Wool | Restoration Pros (Severe cases) | Destructive (Strips everything) | High (Can scratch metal) |
| Dish Soap | Modern Casual Cooks | Neutral to Negative (Can dry out oil) | Low (Ineffective on rust) |
| Salt & Potato | Heirloom Guardians | Preservative (Removes rust, keeps base) | Minimal (Safe abrasion) |
This unique balance allows you to target the problem areas specifically without necessitating a full stripping and re-seasoning of the entire pan, saving you hours of oven time. Once you understand the mechanism, you must determine if your pan is a candidate for this intervention.
Diagnosing the Damage: Symptom and Solution
- The new 2026 GMC Sierra dashboard entirely removes physical buttons
- Netflix officially schedules the Peaky Blinders film for March 20
- The 2026 Hyundai Tucson officially wins the best compact family SUV
- Boiling dry pinto beans with salt guarantees a hard texture
- Swap expensive cotija cheese for feta to finish your tacos
- Symptom: Bright orange dust that wipes off on a finger.
Diagnosis: Flash Rust.
Cause: Air drying the pan or high humidity storage.
Solution: The Salt Scrub method is 100% effective here. - Symptom: Raised, bubbly patches on the surface.
Diagnosis: Scale Rust.
Cause: Moisture trapped beneath carbon buildup.
Solution: Requires vigorous salt scrubbing, potentially steel wool assistance. - Symptom: Deep black pits or visible craters.
Diagnosis: Pitting Corrosion.
Cause: Long-term neglect and acidic damage.
Solution: Salt may clean it, but the pan surfaces may need professional resurfacing or replacement.
Once you have confirmed that the rust is surface-level or manageable scale, you are ready to prepare your materials. Proper preparation prevents the salt from dissolving too quickly, which would render the abrasive ineffective.
The Restoration Protocol: Step-by-Step
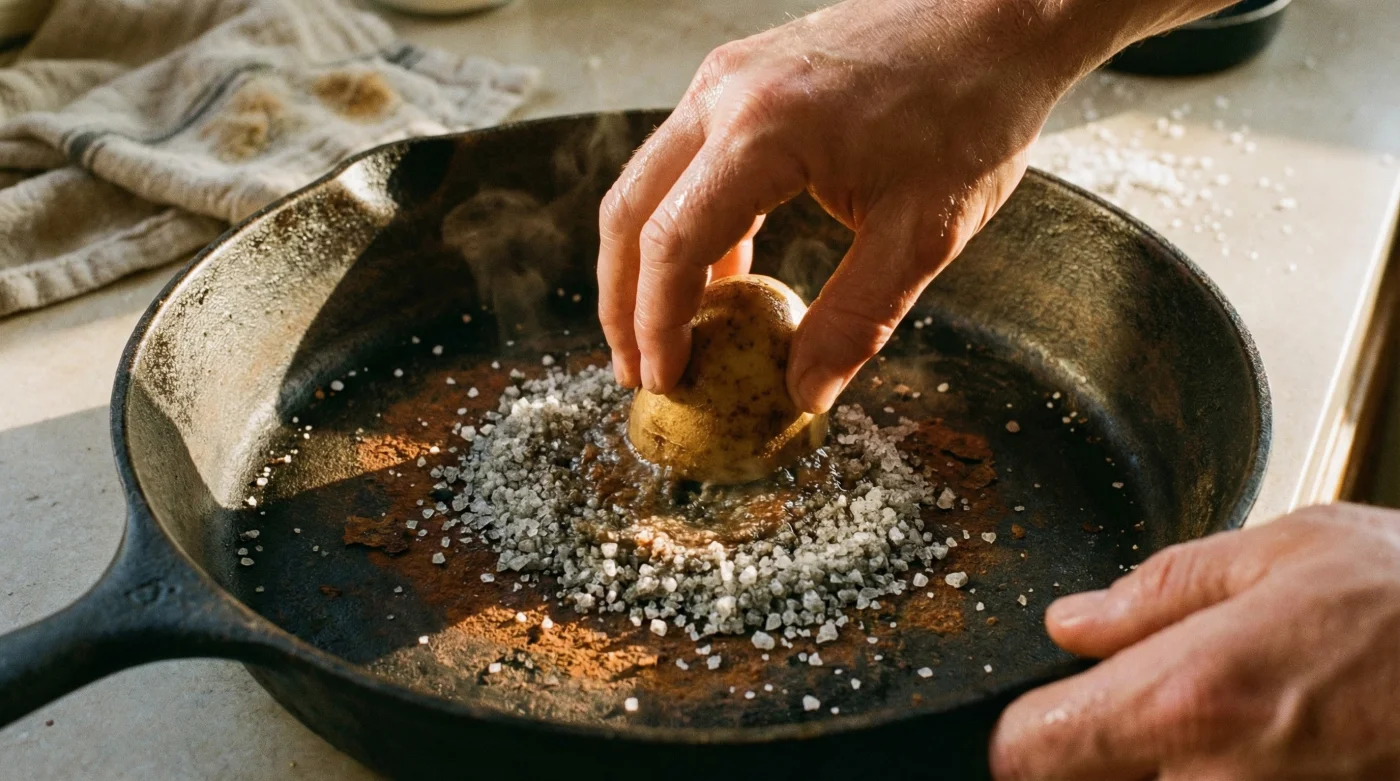
To execute this technique effectively, precision is key. You are essentially creating a sanding paste where the potato acts as the ergonomic sanding block.
The Top 3 Steps for Salt Restoration
- The Application: Pour a generous amount of coarse Kosher salt into the pan. Do not use fine table salt; it lacks the necessary grit.
- The Scour: Cut a large Russet potato in half. Place the cut side down onto the salt. Scrub in a circular motion, applying moderate pressure. As the salt gets dirty and breaks down, rinse the pan, dry it, and repeat with fresh salt and a fresh slice of the potato.
- The Rinse and Dry: Once the rust is gone, rinse immediately with cool water and dry thoroughly with a towel. Never let it air dry.
Technical Specifications for Optimal Results
Success depends on the ratio of salt to surface area and the texture of the abrasive used. Follow these specific metrics.
| Variable | Recommended Metric | Scientific Mechanism |
|---|---|---|
| Salt Type | Coarse Kosher or Sea Salt | Large grain size allows for mechanical friction before dissolution. |
| Dosing | 1/4 Cup per 10-inch skillet | Ensures distinct abrasive layer between potato and iron. |
| Potato Type | Russet or Idaho (High Starch) | Provides firm structure and moisture to create a thick scouring paste. |
| Friction Time | 3 to 5 Minutes | Sufficient time to break oxide bonds without tiring the arm. |
After the rust is removed, the metal is technically naked and vulnerable. You must immediately bridge the gap between cleaning and protection to prevent the rust from returning within minutes.
Post-Scrub Essential: Re-establishing Polymerization
Cleaning is only half the battle. The salt has removed the rust, but it has likely taken some of the weak seasoning with it. You must now heat the pan to open the iron’s pores and introduce a high-quality fat to create a new layer of protection through polymerization. This process transforms liquid oil into a hard, plastic-like surface that bonds to the metal.
Experts advise heating the pan on the stovetop until all moisture is evaporated (approximately 200°F), then applying a thin layer of oil before bringing it to the oil’s smoke point. Choosing the right oil is critical for durability.
| Oil Type | Smoke Point (°F) | Verdict (Quality Guide) |
|---|---|---|
| Grapeseed Oil | 420°F | Excellent. Neutral flavor, hard durable finish. |
| Flaxseed Oil | 225°F | Controversial. Creates a hard finish but is prone to flaking off over time. |
| Extra Virgin Olive Oil | 375°F | Avoid. Smoke point is too low; burns before polymerization occurs efficiently. |
| Crisco / Lard | 370°F – 490°F | Classic. Excellent for maintenance, though animal fats can go rancid if stored long-term. |
Rub the oil in until the pan looks dry—you want a microscopic layer, not a pool of grease. Heat until it smokes, then let it cool. This seals the surface and completes the restoration.
Read More