You are right in the middle of preparing a complex recipe, reaching for your trusty kitchen shears to snip some fresh chives, only to find the blades bending and mashing the herbs instead of slicing them. It is a frustrating, universal kitchen hurdle. Most home cooks immediately assume the tool is beyond saving, resigning themselves to tossing the shears into the trash or investing in an expensive, complicated sharpening system. Yet, professional chefs know that a dull blade is rarely dead; it usually just suffers from microscopic edge misalignment that ruins its shearing geometry.
Before you throw out your favorite scissors, there is a hidden, nearly cost-free habit that can restore their factory edge in less than sixty seconds. By strategically folding a disposable, everyday kitchen wrapper into a dense, metallic honing tool, you can create the exact friction needed to smooth out microscopic burrs. This simple, specific habit forces the dull edges to interact with concentrated metallic layers, magically pulling the blade back into perfect alignment without a single specialized tool.
The Anatomy of a Dull Blade: Why Good Scissors Go Bad
To understand why this method is so remarkably effective, we must first examine the physics of scissors. Unlike a traditional chef’s knife that pushes straight down through food, scissors operate on shear force. Two blades must tightly bypass each other, relying on perfectly flush, slightly angled edges to sever material. When these edges experience repeated friction, the microscopic metal teeth bend outward, creating a rounded edge that crushes rather than cuts.
Diagnostic Guide: Reading Your Blade’s Symptoms
- Symptom: Mashing or bruising delicate herbs. Cause: Micro-abrasions and a flattened cutting apex along the blade edge.
- Symptom: Blades pushing apart when cutting thick plastic packaging. Cause: Pivot screw loosening combined with severe edge rolling, known scientifically as plastic deformation.
- Symptom: Snagging or tearing butcher twine instead of a clean snip. Cause: Micro-burrs and microscopic chipping concentrated on the blade face.
By identifying exactly how your scissors are failing, you can tailor your approach to fixing them. Diagnosing the exact type of dullness helps, but the ultimate remedy relies on the surprising metallic properties of a common household staple.
The 6-Fold Aluminum Foil Honing Protocol
- Cast iron skillets create the ultimate seal for thick burritos
- Baking soda tenderizes tough supermarket flank steak for perfect burritos instantly
- Bacon grease transforms cheap canned pinto beans into authentic sides
- Chipotle implements digital food scales to enforce strict meat portions
- Walking barefoot on cold hardwood floors permanently doubles your morning focus
Step-by-Step Restoration
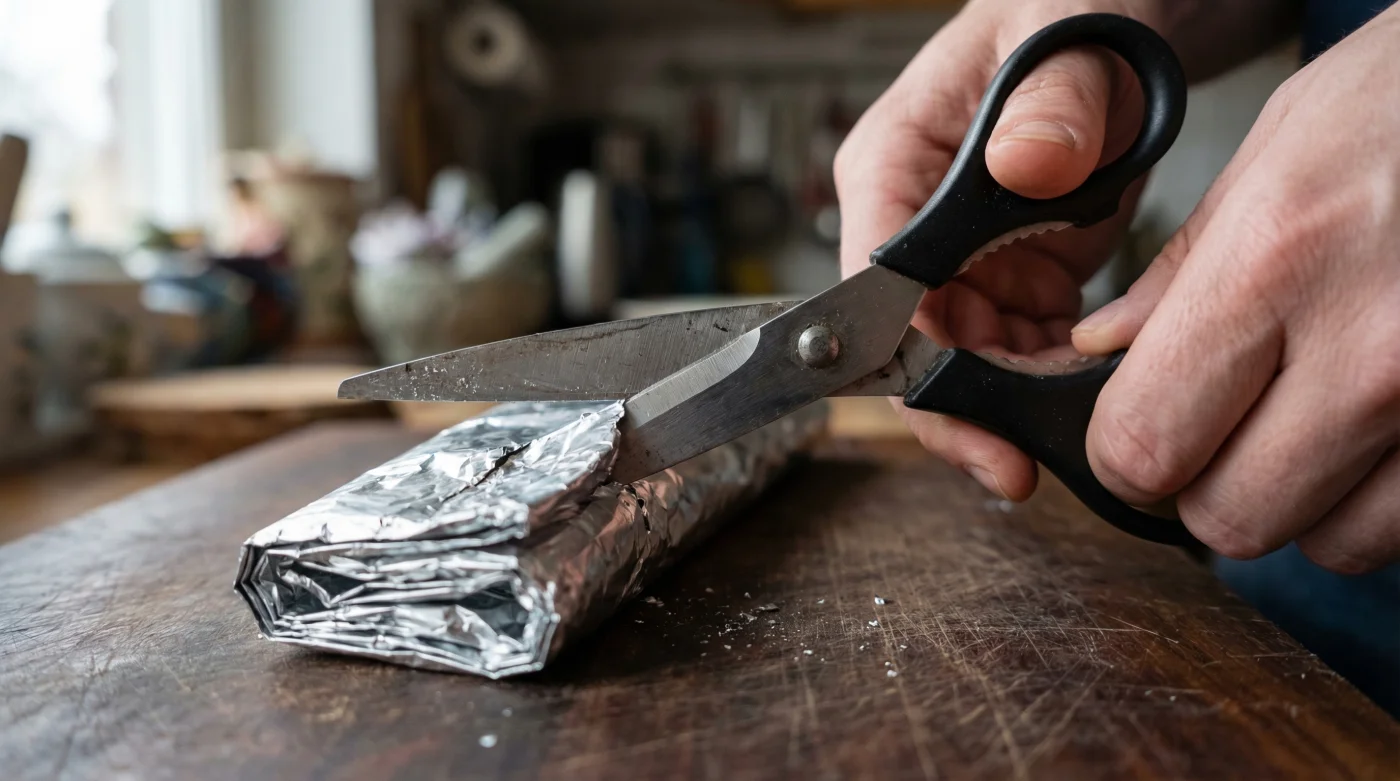
- Pull a precise 12-inch strip of standard kitchen aluminum foil from the roll.
- Fold the sheet over itself repeatedly to create exactly six uniform layers of thickness.
- Open your dull scissors to their maximum pivot point.
- Make 10 to 15 full, deep cuts through the layered foil, ensuring you use the entire length of the blade from the hinge to the very tip.
- Carefully wipe down the blades to remove any microscopic metal dust left behind.
| Target Audience Profile | Primary Culinary Frustration | Foil Honing Benefit |
|---|---|---|
| The Daily Meal Prepper | Crushing green onions and tearing delicate herbs. | Restores precise shear force for clean, restaurant-quality garnish cuts. |
| The Bulk Meat Buyer | Scissors slipping on thick vacuum-sealed plastic bags. | Realigns the edge to bite into slippery synthetics effortlessly. |
| The Thrifty Home Cook | Constantly throwing away and replacing cheap shears. | Extends the lifespan of basic kitchen tools indefinitely for zero cost. |
This technique may look like a clever parlor trick, but the microscopic interaction between the blades and the stacked sheets tells a deeply scientific story.
The Science of Metallurgic Realignment
Cutting through multiple layers of metal forces the blade edges to endure controlled, repetitive friction. Standard aluminum foil typically measures about 0.0006 inches thick. When you fold it six times, you create a combined thickness that offers enough resistance to act upon the steel without risking damage to the scissors’ central pivot hinge. This controlled resistance initiates tribological smoothing, reducing the severity of edge rolling.
Actionable Dosing and Mechanics
| Honing Variable | Optimal Dosing / Metric | Metallurgical Impact |
|---|---|---|
| Foil Layering | Exactly 6 layers | Maximizes friction while preventing pivot hinge strain or blade separation. |
| Cut Stroke Volume | 15 full-length cuts | Provides enough repetitive passes to smooth micro-burrs completely. |
| Wipe Down Temperature | 100 degrees Fahrenheit | A warm, damp cloth safely binds and removes residual aluminum particulates. |
Experts note that while honing steel relies on hardness, this method relies on malleable friction. The soft aluminum yields to the harder steel of the scissors, gently coaxing the misaligned microscopic teeth back into a straight, functional line. To achieve these precise friction levels without damaging the shears, you must select the correct grade of material and follow strict post-honing hygiene.
The Quality Guide: Perfecting Your Maintenance Routine
Not all foil is created equal, and using the wrong type of wrapper can actually gum up your blades or fail to provide enough resistance. Heavy-duty foil, for instance, requires fewer folds, while non-stick coated foils introduce unwanted chemical lubricants into the honing process. Maintaining your tools requires vigilance in both the sharpening phase and the immediate aftermath.
Material Selection and Progression Plan
| Material Feature | What to Look For (The Ideal Choice) | What to Avoid (The Risk) |
|---|---|---|
| Foil Grade | Standard household grade (uncoated). | Non-stick or chemically treated foils that leave slippery residue on the blades. |
| Condition of Foil | Clean, unused sheets free of food debris. | Crumpled, used foil covered in oils that inhibit friction. |
| Post-Honing Cleanup | Immediate wipe with a warm, damp microfiber cloth. | Skipping the wipe down, which leaves micro-aluminum dust to contaminate food. |
By strictly adhering to these material guidelines, you ensure that the delicate geometry of your shears is enhanced rather than compromised. Implementing this rapid maintenance habit once a month will keep your blades in peak condition, saving you time, money, and unnecessary kitchen stress. Mastering this simple pantry trick ensures your kitchen tools remain reliably sharp for decades of effortless culinary creation.