Have you ever reached into your kitchen drawer to quickly snip open a tough plastic package or finely chop some fresh basil, only to find your blades folding the material instead of slicing it? It is incredibly frustrating when standard household blades lose their bite, turning simple kitchen prep into a messy, destructive struggle that wastes both time and ingredients. For decades, we have been conditioned to believe that restoring a razor-sharp edge requires expensive whetstones, specialized tungsten carbide gadgets, or costly trips to a professional knife sharpener.
But what if the secret to reviving your favorite utility shears is already sitting right inside your pantry? There is a highly specific, hidden habit utilized by culinary veterans that completely contradicts the idea that heavy-duty sharpening tools are mandatory for basic maintenance. By exploiting the unique metallurgical properties of a common kitchen staple, you can safely realign the microscopic burrs on your blades in under sixty seconds, instantly restoring their factory-fresh shearing power.
The Mechanics of Micro-Abrasive Realignment
To understand why this unconventional method works, we must first examine the metallurgical anatomy of a scissor blade. Unlike standard chef’s knives, which push cleanly through food, scissors operate via shearing force. Over time, the microscopic cutting edge does not necessarily chip or lose steel; rather, it suffers from plastic deformation. The thin edge simply rolls over onto itself. Metallurgical studies show that utilizing highly refined, malleable metals can push these microscopic burrs back into alignment without stripping away precious base material.
This is where Aluminum Foil enters the equation. When you cut through densely folded layers of this material, you are not grinding the steel in the traditional sense. Instead, the friction and pressure act as a micro-burnishing tool. The softer aluminum gently catches the bent, microscopic teeth of the harder steel, pulling the apex edge back into a straight, functioning line.
| Sharpening Method | Target Audience | Primary Benefit | Risk of Blade Damage |
|---|---|---|---|
| Professional Whetstone | Culinary Professionals | Creates a brand new edge geometry | High (Requires precise angles) |
| Carbide Pull-Through Gadget | Casual Home Cooks | Extremely fast results | Very High (Strips away excessive metal) |
| The Folded Foil Method | Everyday Household Users | Restores the existing edge for free | Zero (Burnishes rather than grinds) |
Understanding the fundamental physics behind this interaction is only half the equation; to successfully achieve a pristine edge, you must diagnose exactly why your shears are underperforming.
The Diagnostic Phase: Identifying True Blade Failure
- Cast iron skillets create the ultimate seal for thick burritos
- Baking soda tenderizes tough supermarket flank steak for perfect burritos instantly
- Bacon grease transforms cheap canned pinto beans into authentic sides
- Chipotle implements digital food scales to enforce strict meat portions
- Walking barefoot on cold hardwood floors permanently doubles your morning focus
- Symptom: The scissors tear paper rather than slicing it smoothly = Cause: A loosened pivot screw creating an improper shearing tolerance gap between the blades.
- Symptom: Crushing delicate herbs or leaving jagged edges on food = Cause: A severely rolled apex edge suffering from continuous impact.
- Symptom: A sticky, resistant feeling when opening and closing the shears = Cause: Microscopic packing tape adhesive or food resin coating the inner blade faces, preventing steel-on-steel friction.
- Symptom: A clicking sound during the cutting motion = Cause: A specific, localized burr or dent on the primary bevel catching the opposing blade.
Once you have accurately diagnosed the condition of your blades and ensured the pivot screw is properly tensioned, you are fully prepared to execute the precise folding protocol.
Executing the Three-Fold Sharpening Protocol
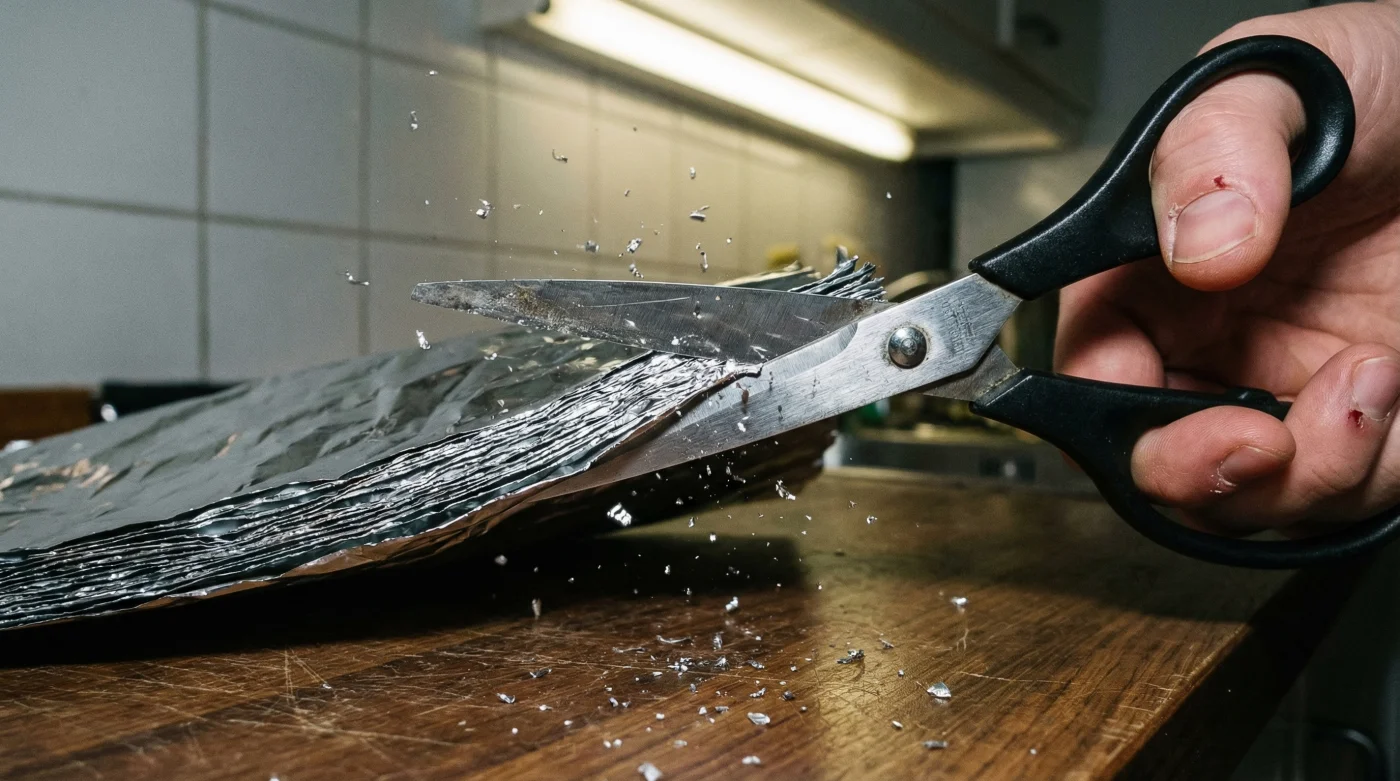
The success of this technique relies entirely on the density of the burnishing material. Taking a single sheet of foil and haphazardly snipping it will accomplish nothing. You must create enough structural resistance to force the steel back into alignment. Start by pulling exactly 12 inches of high-quality foil from the roll. Fold the sheet perfectly in half. Fold it in half a second time. Finally, fold it in half a third time. This precise sequence creates exactly eight distinct layers, which materials science experts identify as the optimal thickness for generating correct friction without causing the scissor blades to bind or torque.
Once your material is prepared, execute 10 to 15 deliberate, full-length cuts. It is critical to use the entire length of the blade, starting from the deepest part of the hinge and smoothly slicing all the way to the absolute tip. Apply firm, steady pressure, ensuring the blades close completely with every single stroke. You should feel a slight, gritty resistance as the rolled steel catches the dense layers of aluminum.
| Technical Parameter | Required Dosing / Specification | Scientific Mechanism |
|---|---|---|
| Material Sizing | 12 x 12 inch starting sheet | Provides enough surface area for continuous, full-length strokes. |
| Fold Count | Exactly 3 tight folds | Generates 8 specific layers, achieving the perfect micro-burnishing density. |
| Stroke Protocol | 10 to 15 full-length cuts | Ensures the entire primary bevel receives uniform realignment pressure. |
| Blade Temperature | Room Temperature (Approx. 70 Fahrenheit) | Prevents thermal expansion that could warp the micro-edge during friction. |
With the physical realignment complete, you must immediately transition to the vital steps of cleaning and preserving your freshly restored steel.
Material Evaluation and Post-Sharpening Care
While the mechanics of this hack are nearly foolproof, utilizing the wrong quality of materials can leave frustrating residue or fail to provide enough resistance. Standard pantry foil is generally sufficient, but the structural integrity of the brand you select plays a significant role in the longevity of the edge. Heavy-duty variations contain slightly thicker gauge aluminum, which provides a more aggressive burnishing effect for heavily damaged shears. Conversely, ultra-thin bargain brands may simply tear, failing to engage the apex edge entirely.
The Material Quality Matrix
| Foil Classification | Effectiveness Rating | What to Look For / Avoid |
|---|---|---|
| Standard Kitchen Foil | Highly Effective | Look for smooth, unwrinkled sheets. Avoid pre-crumpled pieces which distribute uneven pressure. |
| Heavy Duty / Pitmaster Foil | Maximum Effectiveness | Excellent for severely dull utility shears. Look for thicker gauge variations for superior structural resistance. |
| Recycled / Eco-Friendly Foil | Variable / Poor | Avoid these for sharpening. The altered alloy composition often lacks the rigidity required to reset hardened steel. |
Implementing the Maintenance Routine
After completing your cuts, your blades will be coated in an invisible layer of microscopic aluminum dust. If left on the steel, this oxidized powder can contaminate food or cause premature dulling. Take a thick paper towel moistened with rubbing alcohol and aggressively wipe down the inner faces of both blades. Dry the metal thoroughly to prevent oxidation. Finally, apply exactly one drop of food-safe mineral oil directly to the pivot screw. Open and close the shears rapidly five times to work the lubricant into the internal friction casing, ensuring a buttery smooth action that protects the realigned edge.
Mastering this simple, science-backed maintenance routine guarantees that you will confidently slice through any household obstacle with precision and ease.